Getting started with pipenv
Hey again!
My debut python blog & I am super excited to present this to you all. I was never really a Pythonista (I am still not). I have grown to like Python - even over languages that I was once comfortable with. My exposure to Python was primarily during my internship at Setu. Since the past 1-1.5 years, my exposure has only gone upwards & I have used Python for numerous personal & professional projects. I can safely say that Python is my go-to language now for pretty much everything. The rationale is pretty simple - it just works everywhere. My profile requires me to automate a few things now and then. Honestly, Python has been my best bud for these tricks. As a result, I used tools to improve my workflow. This blog is about me sharing one of these experiences.
Enough intro, this blog is my experiment with the Python package pipenv & my experience working with it. Spoiler alert: you might end up using this for your projects after this xD. Disclaimer, the first 2 sections of the blog are for beginners.So, if you're an Intermediate python developer who is familiar with pip, virtual environments etc, feel free to skip to the pipenv section! You would be able to appreciate the blog more since this is more of an insight than a tutorial.
Another disclaimer, I use the words dependency and package interchangeably. Please do not get confused - they mean the same thing.
Lets' dive into it!
What is pip?
Even if you’re remotely aware of Python, you would know what pip is. pip is the package manager for Python. It is a command-line tool that installs packages (third-party packages included) by default from PyPi, Python’s official package repository. For understanding, pip is to Python what npm is to Javascript or pub is for Dart/Flutter - not entirely the same though. There have been other tools as well but, pip is the one that has stuck along & is also a part of the official Python installation.
By default, any packages installed via pip get stored in the site-packages directory where your interpreter is installed (python’s interpreter. Subsequently, this implies that, by default, you can find the packages installed on your machine on a path similar to the following:
/Users/AM/.pyenv/versions/3.8.12/lib/python3.8/site-packages
This will be unique to your system. If you explore this location on your terminal, you can see the list of packages installed on your machine. Here is my list for reference:
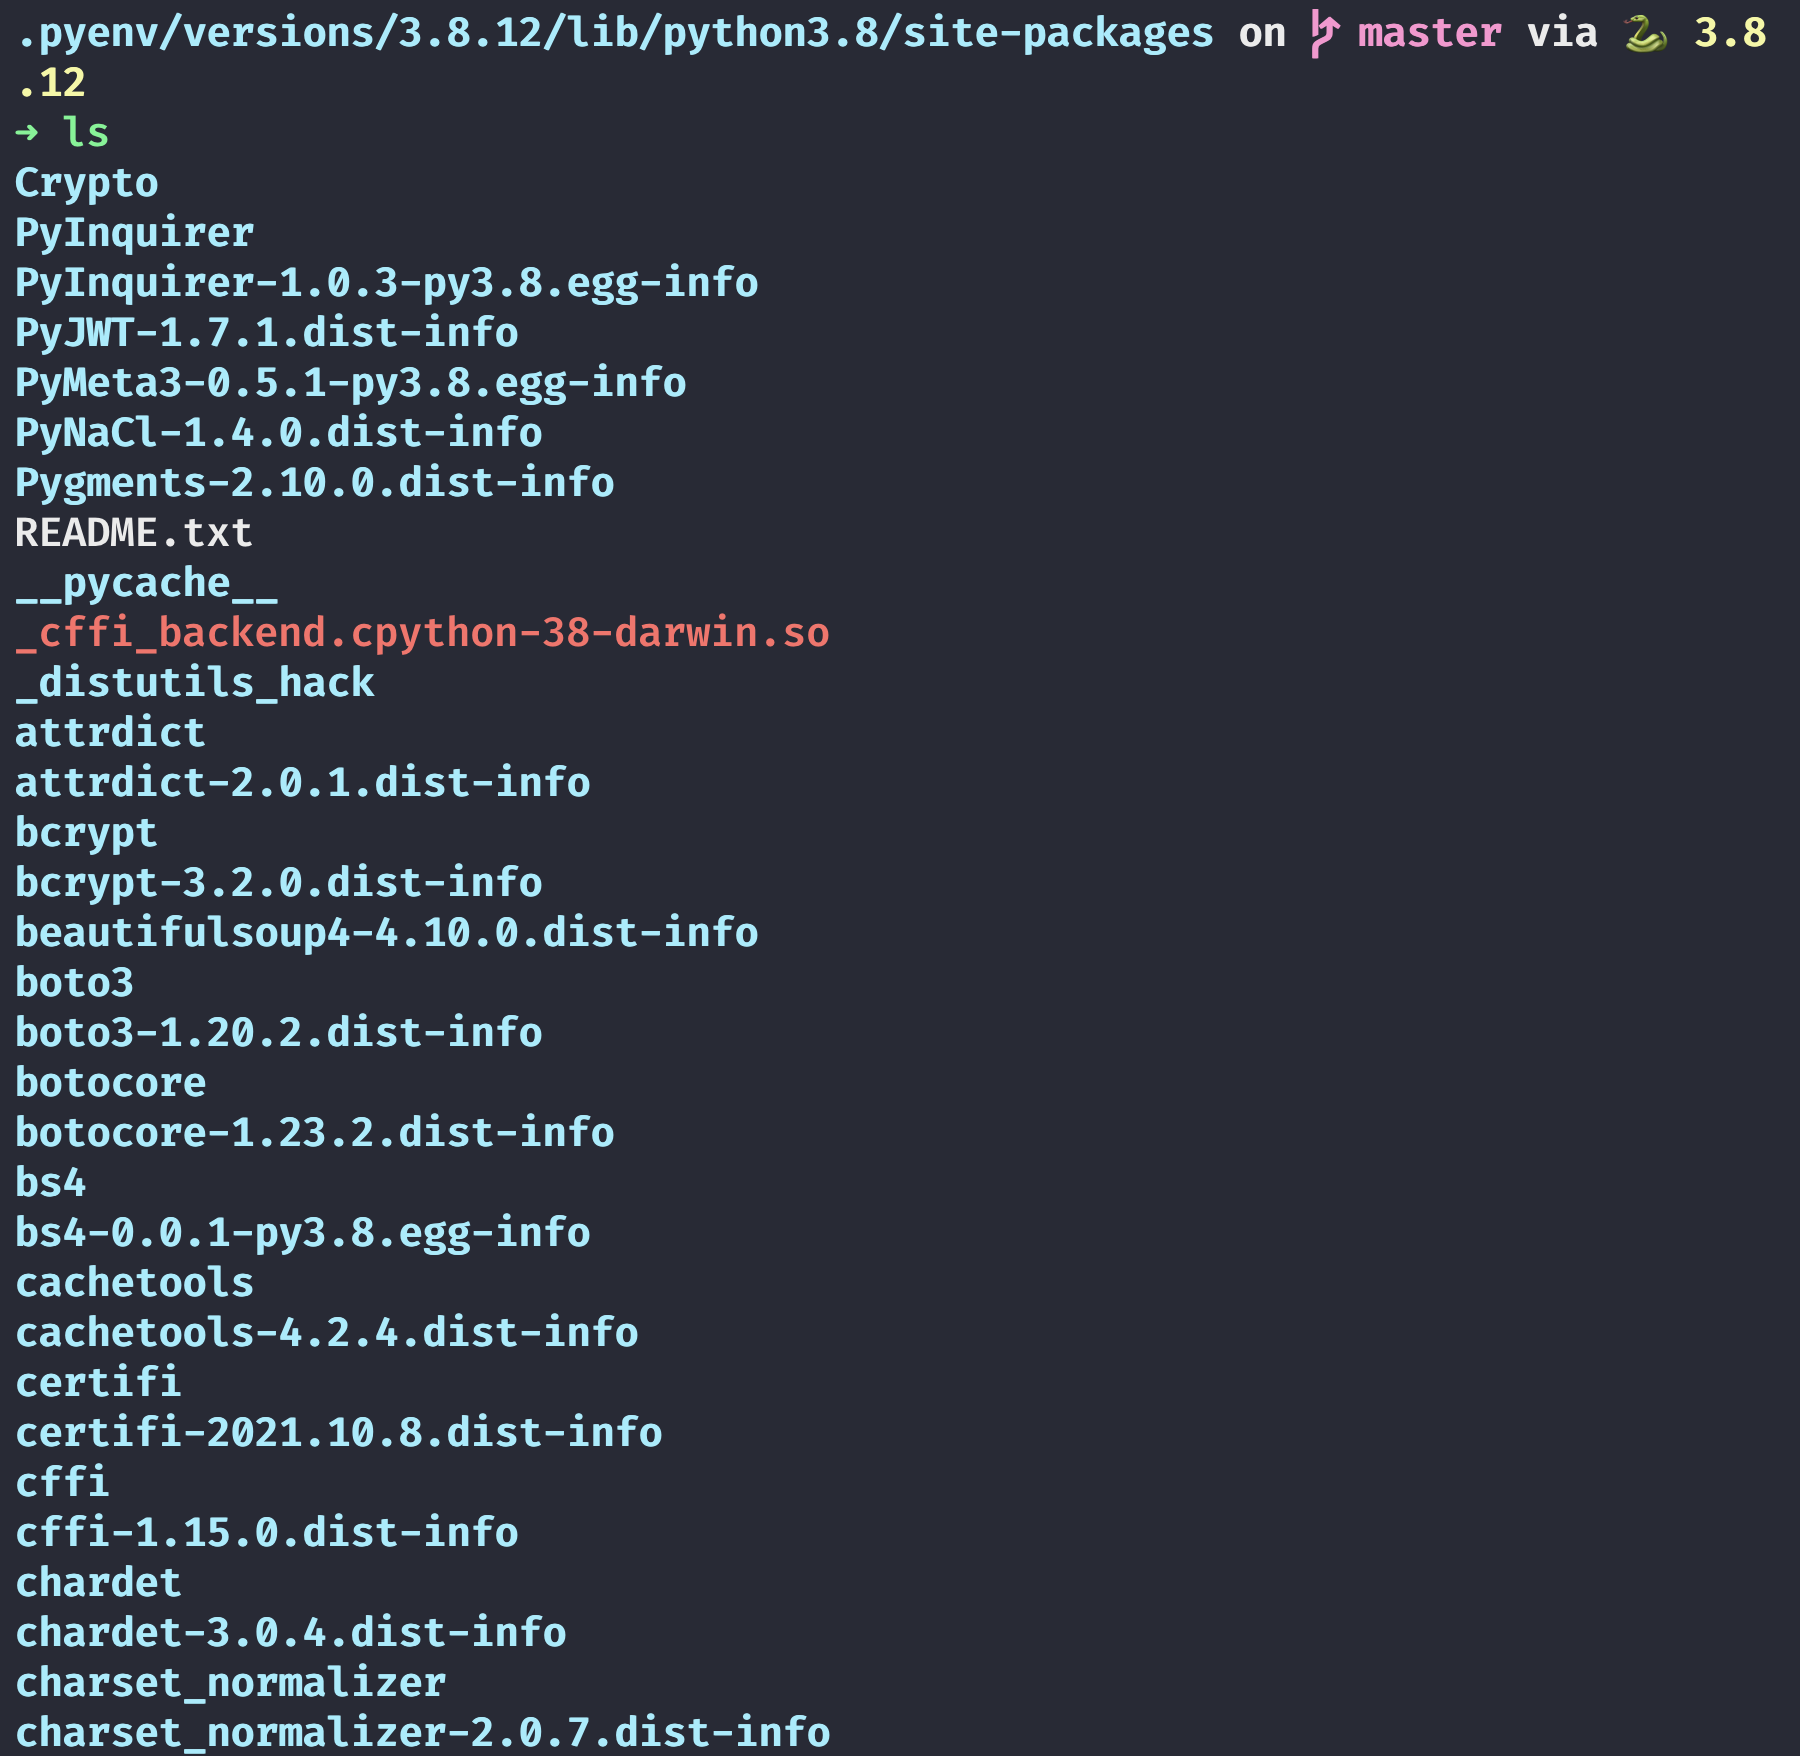
The list is lengthy, but you can see that the path is the same as the path given above. You can also recognize some packages like Crypto, PyInquirer etc.
If we want to install a new package, say requests, run:
pip install requests
And after this, if we inspect the path again, we will find the new package installed. (In my case it was already installed :P)
The above image shows the default behavior. Each pip install, by default goes to the site-packages folder. If you are working on multiple projects - which is likely - then this approach is troublesome. Each project has it's own dependency tree. Let's say you have a project that requires colorama 0.2.2 and there is also a project that requires colorama version 0.4.4. Both versions cannot be installed since both will be stored at site-packages. The existing package version will be overwritten by every new install, hence it would not work.
Virtual Environments?
Virtual environment, virtualenv or venv, is exactly like it sounds. Instead of using the defaults, venv isolates the working directory from the rest of the system. To use virtualenv, we first run:
pip install virtualenv
python3 -m venv env
The first command would install the package to our default location. The second command is creating the virtual environment with the name ‘env’. You can try this yourself by creatina a test directory and running the above commands in it. If you run this command:
tree -d
(NOTE: tree command works only on Linux by default. Please use a package manager like brew or choco for Windows to install tree if you feel like it. The purpose of this command is to show a tree-like structure of the directory you're in)
This is what it looks like in my case:
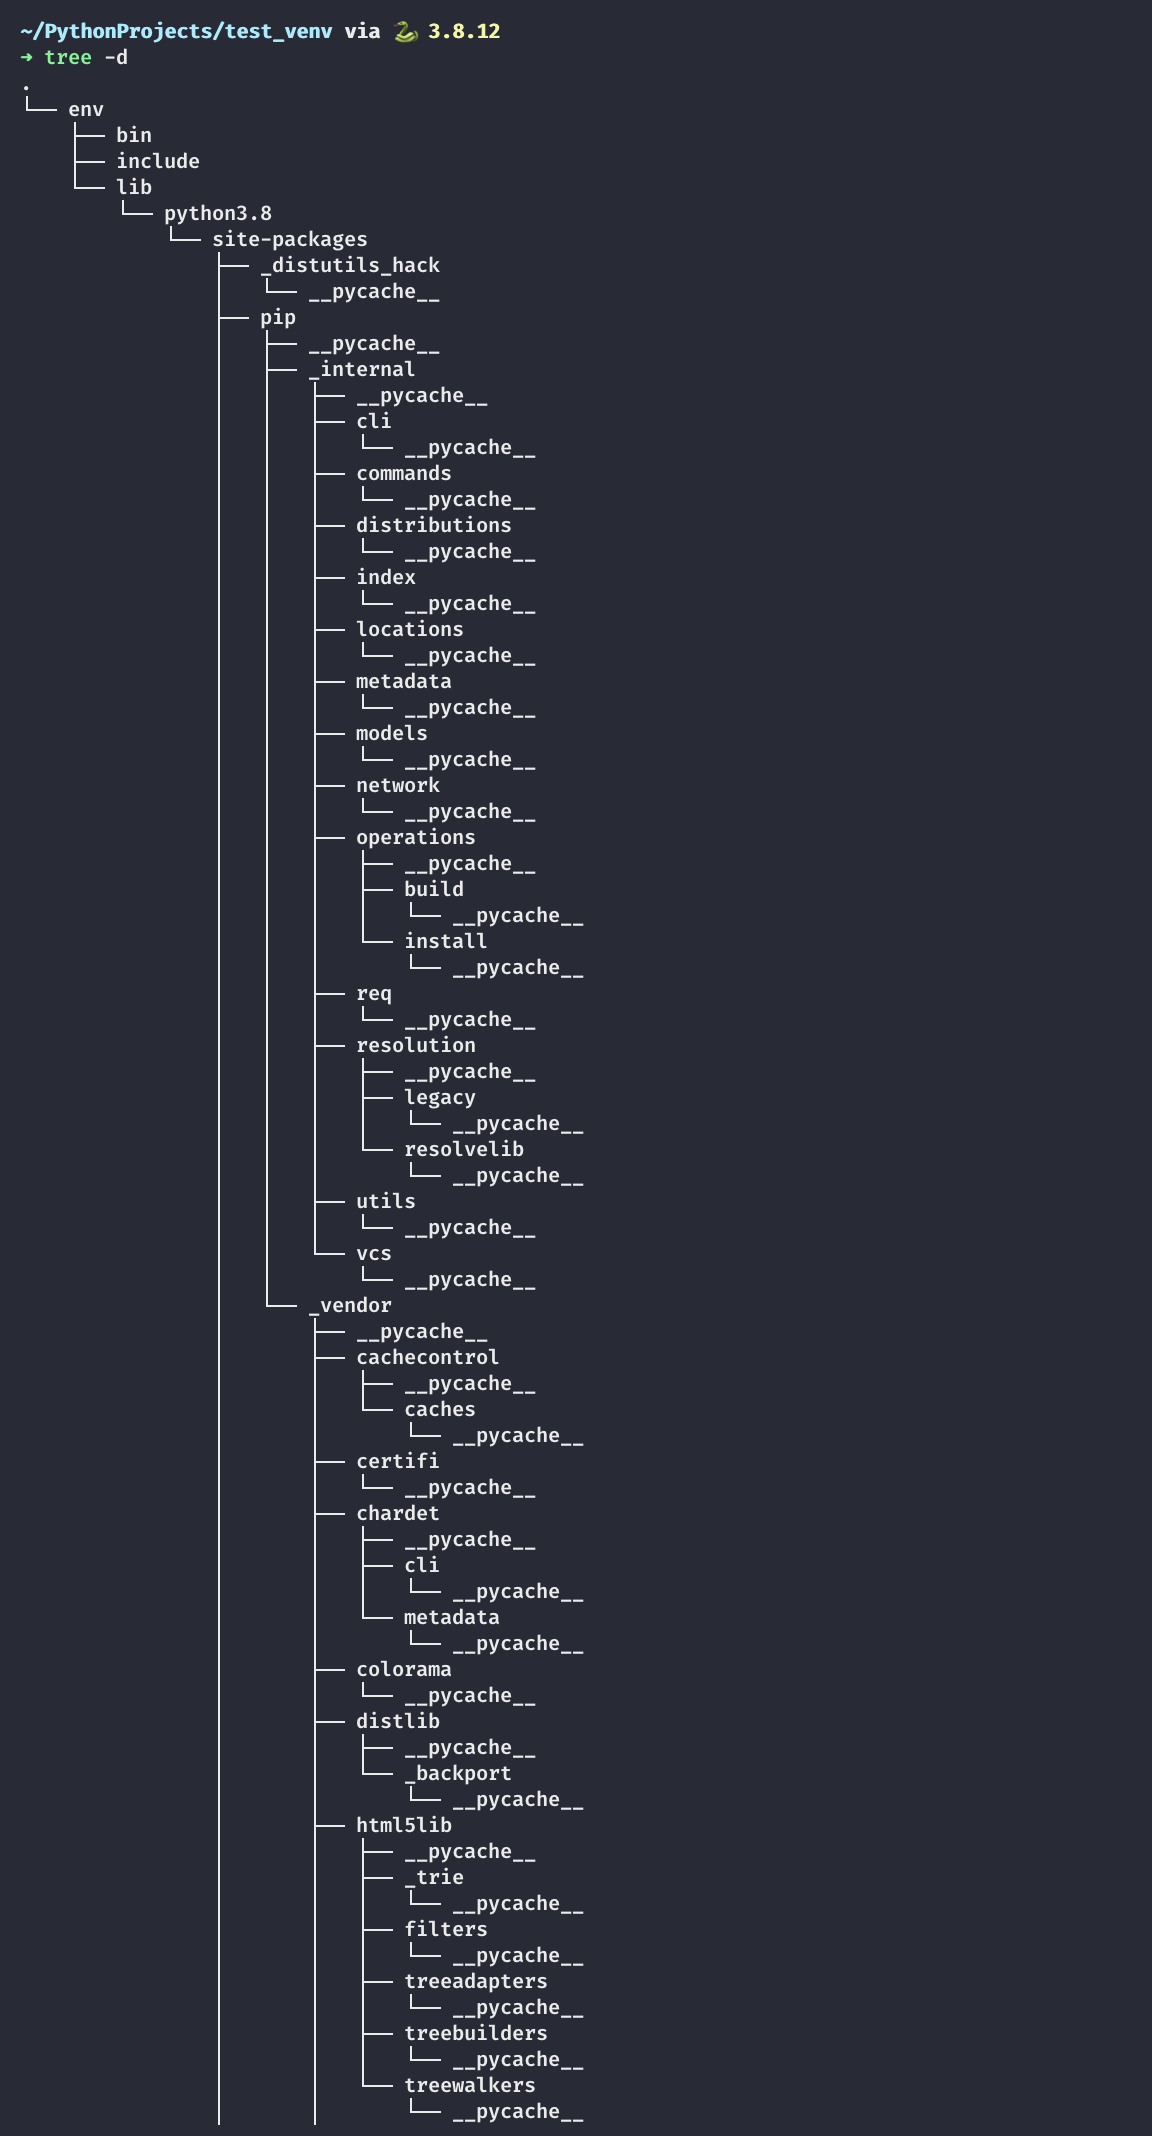
The contents of each folder are as follows:
- bin: files that interact with the virtual environment
- include: C headers that compile the Python packages
- lib: a copy of the Python version along with a site-packages folder where each dependency is installed
For activating the environment, use the following command:
source env/bin/activate
Once that is done, you can see the environment name on the terminal like so.

To check that the environment is indeed independent, use the following code:
import requests

URL = "https://jsonplaceholder.typicode.com/posts/1"


def main():
    response = requests.get(URL)
    print(response.text)


if __name__ == "__main__":
    main()
And run this file. The result would be similar to this:
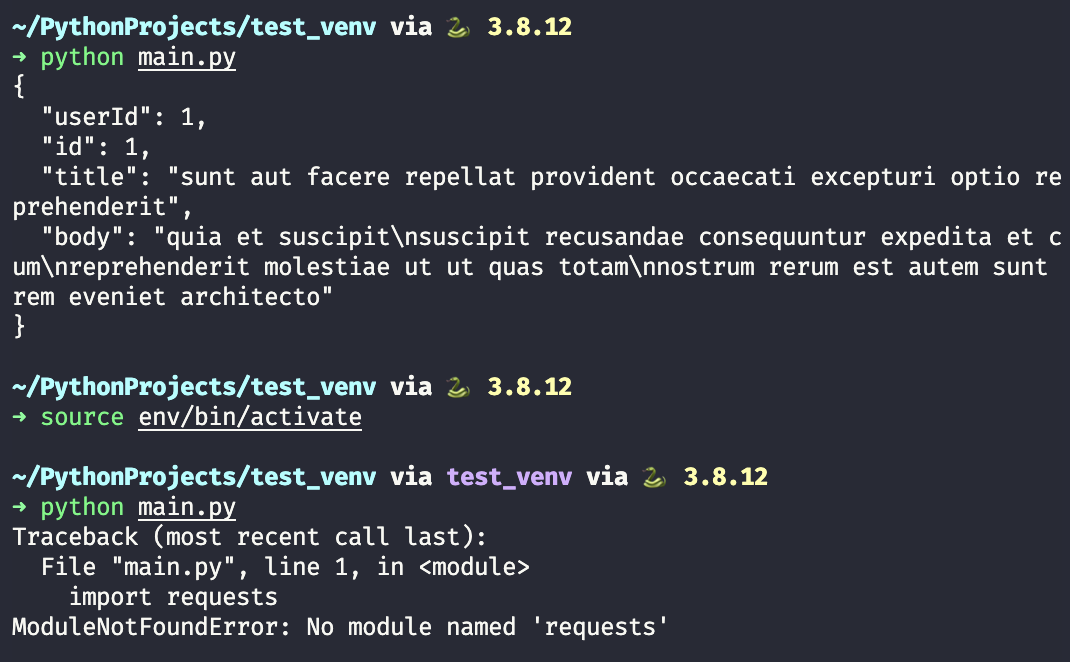
In the first run, we see that the response was successful. Our default site-packages location contains requests package already. Hence there were no errors. If we activate the venv & try this again, we get an error. This is because requests does not exist in this virtual environment. You can verify this by checking out the lib folder. The path env/lib/python3.8/site-packages (in my case), does not contain requests.
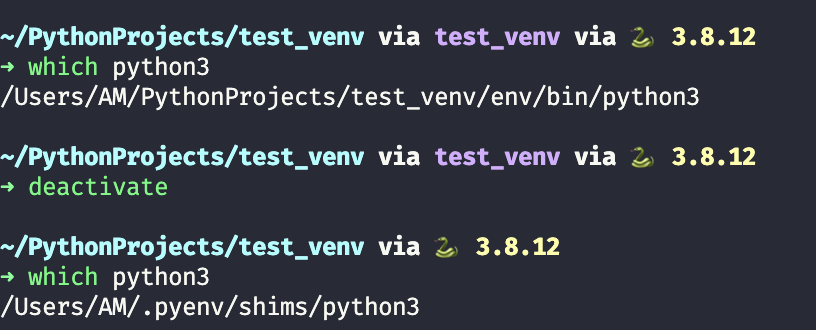
venv also uses a different python interpreter & not the default one on your system. To check this, run the following, one with the virtual environment activated and the other without:
which python
This would work on Linux and Mac. If you’re using windows (please switch soon 😛), run the following:
The "pythonic" workflow
Ideally, any python project would include pip and venv. pip would manage the project dependencies, while venv ensures that the project operates in isolation from the rest of the system. If you have worked with Python you'll relate to this statement: we create a requirements.txt file for every project to keep track of its dependencies & their working versions for that project. To do so, we might do something like :
pip freeze > requirements.txt
The above command would give us a text file that contains all our project dependencies as shown:
certifi==2021.10.8
charset-normalizer==2.0.10
idna==3.3
requests==2.27.1
urllib3==1.26.8
There are a few problems with this approach:
-
First & foremost, there is no separation between dev and production packages, which is present in other languages like Javascript (
package.json). For example, testing libraries are a dev dependency and therefore must be a part of only dev packages. The library should not be a part of production packages. -
Child dependencies (like
certifi) are crucial to parent dependencies (likerequests), without which the final build would not be deterministic. For instance,certifireleases an update. Our next installation for the package requests would include something different from our initial installation. In a dev and production environment, this would mean that ourprod runs on a different config than dev. Consequently, the build might work for us but not for others. -
To tackle the 2nd point, we have
pipfreeze. For each new installation, we can do so and update our requirements, but as a result, we are now responsible for managing the packages. Consequently, this can lead to manual errors later down the line. -
Having one
requirements.txtfile now limits you to a single environment. You cannot have two different lists of packages on the same file (obviously). You can, however, create two files - one for dev dependencies and the other for prod. Now this amplifies the 3rd point. You are now manually managing packages for two environments!
These issues are not apparent when the project size is small & moving parts are less. But in organizations where the team size is considerable & some environments have a very specific dependency tree, it is crucial to tackle the above-listed problems. As you might have guessed, pipenv is here to save the day!
pipenv to the rescue!
pipenv is a combination of pip and virtualenv. It uses both tools under the hood to provide us with the necessary functionality, in a single package. Let’s start using it. I urge you to test the following things that I have presented yourself - along with the blog, if possible.
Execute the following command to install pipenv:
pip install pipenv
As bizarre as it might be, we are using pip to install this package! But I can assure you - this is a one-time setup. We need to let this package install in the site-packages folder. We can use this whenever we want as a regular command-line utility.
Let’s create a test directory to try this out:
mkdir test_pipenv && cd test_pipenv
Within this directory, type the following:
pipenv shell
If you have a single python version installed the above command would work. If however you have multiple python version, it is better to specify which version will be used. This would ensure that **pipenv check **command runs properly & can detect vulnerabilities. For instance, the command I should run:
pipenv shell --python 3.8.12
While discussing package version conflicts later in this blog, I will use the above command. For now, we'll proceed with the defaults.
See the logs that are generated for this (I have given logs from my machine for reference).
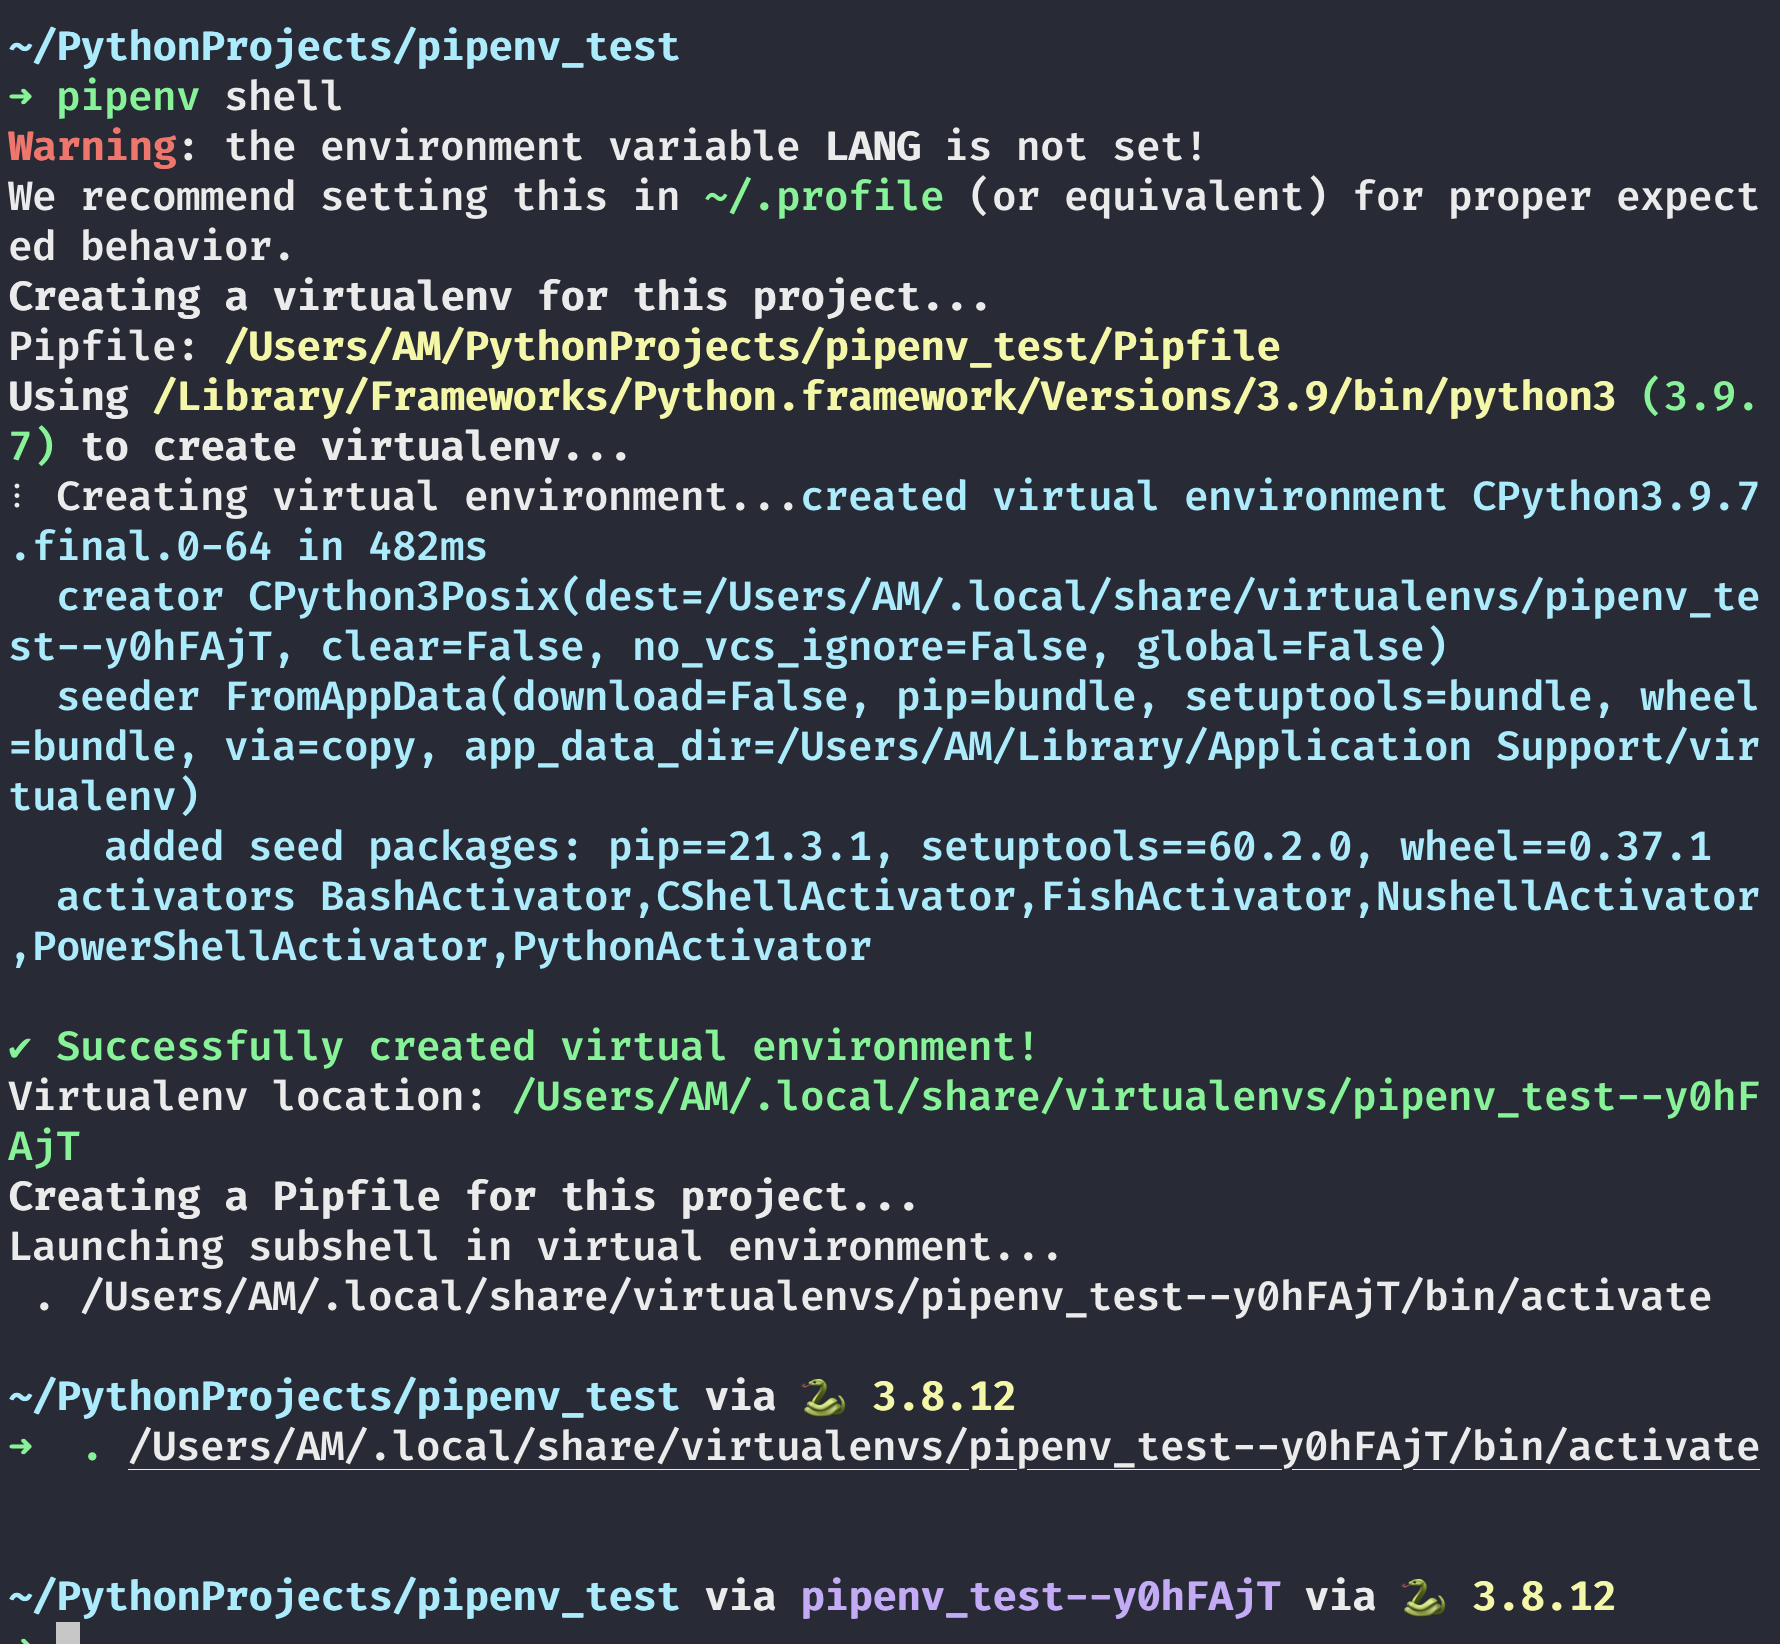
Please ignore the warnings, pipenv works regardless.
This command is creating a virtualenv for this project since it's unable to find an existing environment. If it had found one, it would have activated it instead of creating a new one like this. It is downloading some packages which are necessary for package management, namely wheel, setuptool, etc. Then it creates the new virtual environment and gives us the location for it. This location is OS-specific. As seen from the image, mine is: /Users/AM/.local/share/virtualenvs/pipenv_test--y0hFAjT
If you notice, it contains the **project name - hash**. This is how pipenv knows which environment to activate depending on the project. The reason for this is that pipenv stores virtual environment information centrally. You can justify since there is no new folder created for this virtual environment. Next, a Pipfile is generated. For those who have worked on npm projects, treat this as your package.json. Finally, it just activates the environment, as discussed.
One more thing, you cannot use deactivate to step out of the virtual environment. Instead use exit to close the virtual environment in case of pipenv. If you deactivate, it would still remain active. This is the thread for reference:
StackOverflow Discussion
If you ls right now, you would see a Pipfile in the location. Let’s check its contents.
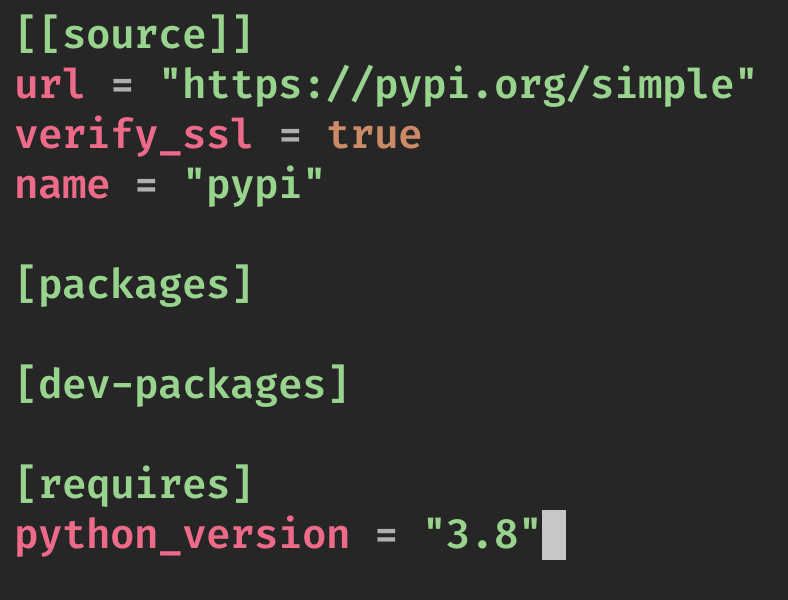
Let’s go from bottom to top.
The last block states the Python version used in the project. This would highlight the version that is used for the production build. It would also give a warning when this version is not met for a particular project (during the pipenv install command). Then there are the dev-packages and packages. The separation of both is what was the limitation with pip. Both are managed by pipenv hence our responsibility reduces. Up top, we have the source. Whenever we do a fresh install, this source would specify the place pipenv would look in for our dependency. Fun fact, this file is a TOML (Tom's Obvious, Minimal Language) file. TOML files are standard in the python package development process.
Let’s install requests as we did in the previous example. To do so, we need to update the command to this:
pipenv install requests
Instead of pip, pipenv will handle our packages now. Just a reminder, we are already in a virtual environment. Subsequently, new dependencies will be installed within our virtual env. The logs for the above command are below:
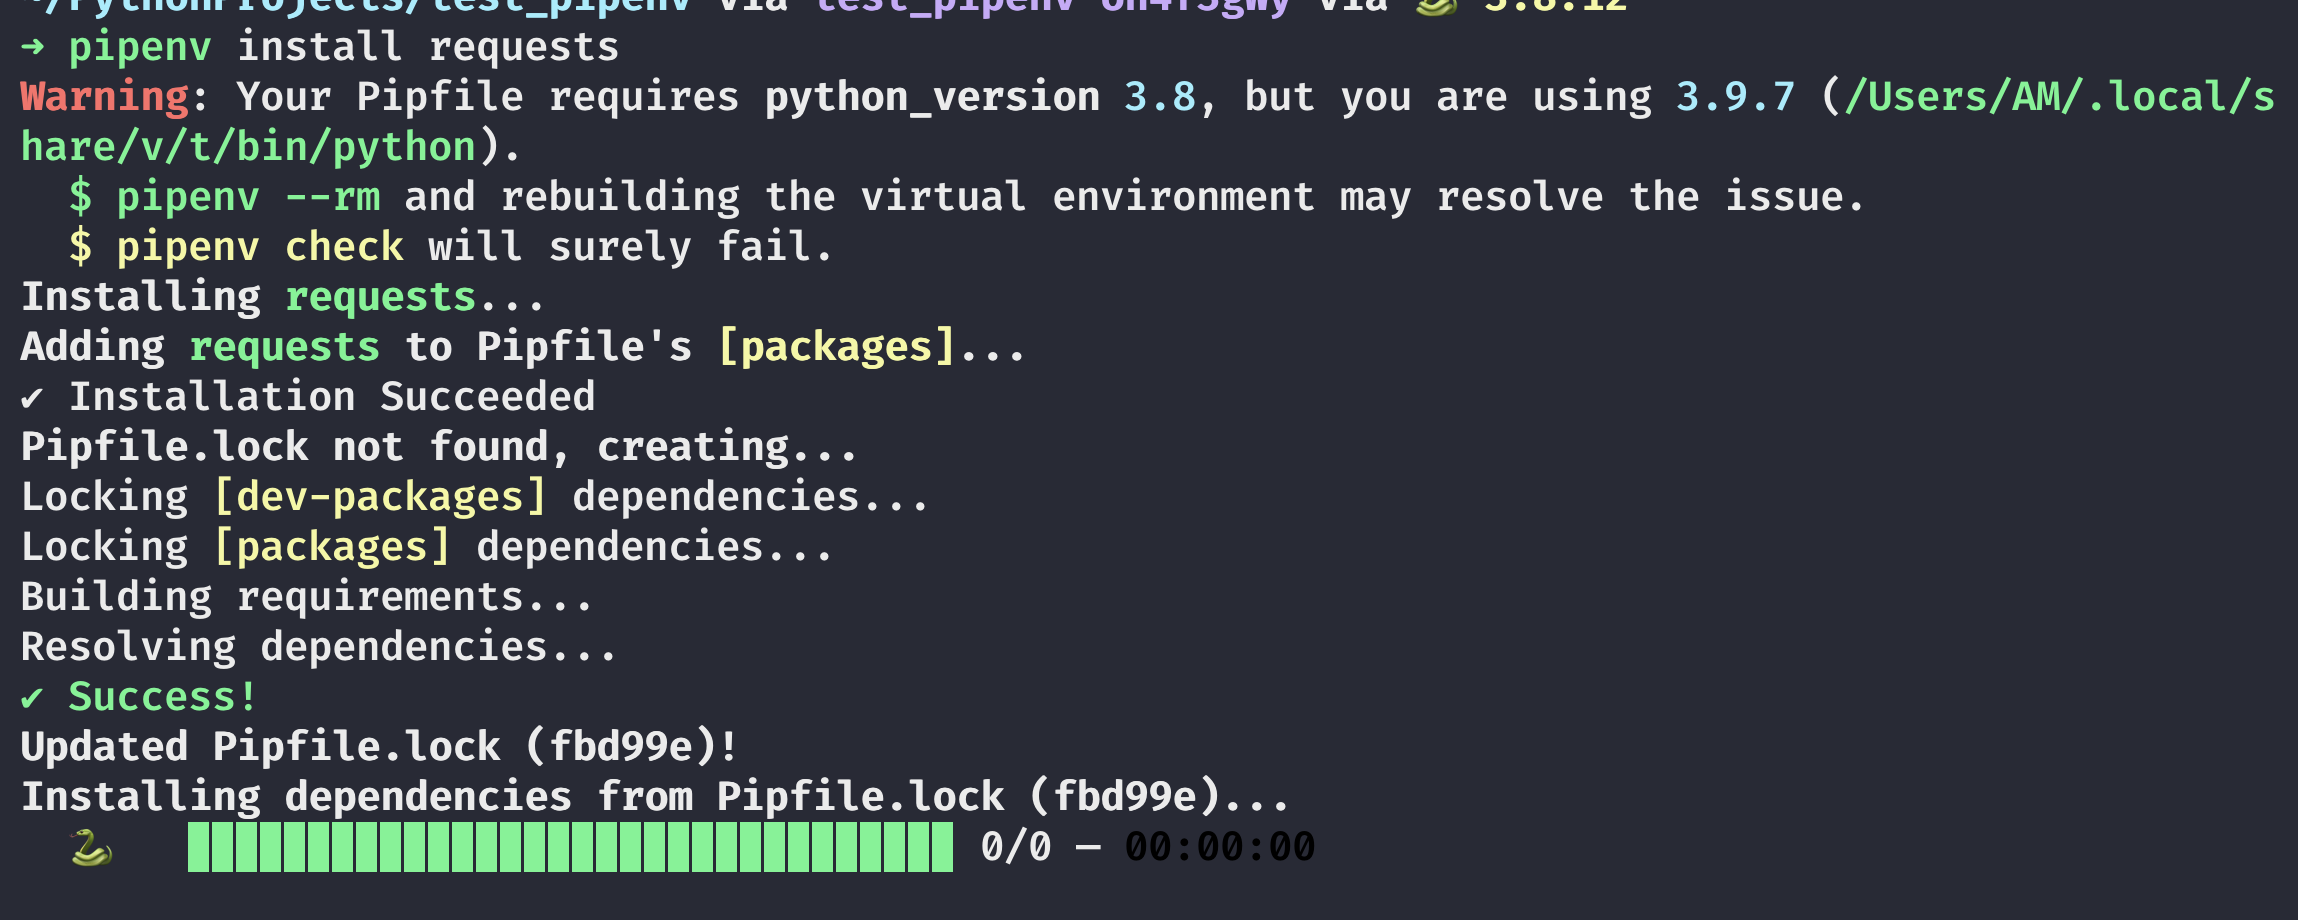
Ignore the warnings again. I have multiple python versions installed using pyenv, hence the issue. You might not see them at all. The command first adds the dependency, then checks for a Pipfile.lock file. When I said Pipfile was package.json I meant it in this sense. Every npm project has a .lock file that contains something like this:
{
  "requires": true,
  "lockfileVersion": 1,
  "dependencies": {
    "ansi-regex": {
      "version": "3.0.0",
      "resolved": "https://registry.npmjs.org/ansi-regex/-/ansi-regex-3.
0.0.tgz",
      "integrity": "sha1-7QMXwyIGT3lGbAKWa922Bas32Zg="
    },
    "cowsay": {
      "version": "1.3.1",
      "resolved": "https://registry.npmjs.org/cowsay/-/cowsay-1.3.1.tgz"
,
      "integrity": "sha512-3PVFe6FePVtPj1HTeLin9v8WyLl+VmM1l1H/5P+BTTDkM
Ajufp+0F9eLjzRnOHzVAYeIYFF5po5NjRrgefnRMQ==",
      "requires": {
        "get-stdin": "^5.0.1",
        "optimist": "~0.6.1",
        "string-width": "~2.1.1",
        "strip-eof": "^1.0.0"
      }
    },
    "get-stdin": {
      "version": "5.0.1",
      "resolved": "https://registry.npmjs.org/get-stdin/-/get-stdin-5.0.
1.tgz",
      "integrity": "sha1-Ei4WFZHiH/TFJTAwVpPyDmOTo5g="
    },
    "is-fullwidth-code-point": {
      "version": "2.0.0",
      "resolved": "https://registry.npmjs.org/is-fullwidth-code-point/-/
is-fullwidth-code-point-2.0.0.tgz",
      "integrity": "sha1-o7MKXE8ZkYMWeqq5O+764937ZU8="
    },
    "minimist": {
      "version": "0.0.10",
      "resolved": "https://registry.npmjs.org/minimist/-/minimist-0.0.10
.tgz",
      "integrity": "sha1-3j+YVD2/lggr5IrRoMfNqDYwHc8="
    },
    "optimist": {
      "version": "0.6.1",
      "resolved": "https://registry.npmjs.org/optimist/-/optimist-0.6.1.tgz",
      "integrity": "sha1-2j6nRob6IaGaERwybpDrFaAZZoY=",

      "requires": {
        "minimist": "~0.0.1",
        "wordwrap": "~0.0.2"
      }
    },
    "string-width": {
      "version": "2.1.1",
      "resolved": "https://registry.npmjs.org/string-width/-/string-width-2.1.1.tgz",
      "integrity": "sha512-nOqH59deCq9SRHlxq1Aw85Jnt4w6KvLKqWVik6oA9ZklXLNIOlqg4F2yrT1MVaTjAqvVwdfeZ7w7aCvJD7ugkw==",
      "requires": {
        "is-fullwidth-code-point": "^2.0.0",
        "strip-ansi": "^4.0.0"
      }
    },
    "strip-ansi": {
      "version": "4.0.0",
      "resolved": "https://registry.npmjs.org/strip-ansi/-/strip-ansi-4.0.0.tgz",
      "integrity": "sha1-qEeQIusaw2iocTibY1JixQXuNo8=",
      "requires": {
        "ansi-regex": "^3.0.0"
      }
    },
    "strip-eof": {
      "version": "1.0.0",
      "resolved": "https://registry.npmjs.org/strip-eof/-/strip-eof-1.0.0.tgz",
      "integrity": "sha1-u0P/VZim6wXYm1n80SnJgzE2Br8="
    },
    "wordwrap": {
      "version": "0.0.3",
      "resolved": "https://registry.npmjs.org/wordwrap/-/wordwrap-0.0.3.tgz",
      "integrity": "sha1-o9XabNXAvAAI03I0u68b7WMFkQc="
    }
  }
}
When we check the contents of the Pipfile.lock we get something like this:
{
  "_meta": {
    "hash": {
      "sha256": "acbc8c4e7f2f98f1059b2a93d581ef43f4aa0c9741e64e6253adff8e35fbd99e"
    },
    "pipfile-spec": 6,
    "requires": {
      "python_version": "3.8"
    },
    "sources": [
      {
        "name": "pypi",
        "url": "https://pypi.org/simple",
        "verify_ssl": true
      }
    ]
  },
  "default": {
    "certifi": {
      "hashes": [
        "sha256:78884e7c1d4b00ce3cea67b44566851c4343c120abd683433ce934a68ea58872",
        "sha256:d62a0163eb4c2344ac042ab2bdf75399a71a2d8c7d47eac2e2ee91b9d6339569"
      ],
      "version": "==2021.10.8"
    },
    "charset-normalizer": {
      "hashes": [
        "sha256:876d180e9d7432c5d1dfd4c5d26b72f099d503e8fcc0feb7532c9289be60fcbd",
        "sha256:cb957888737fc0bbcd78e3df769addb41fd1ff8cf950dc9e7ad7793f1bf44455"
      ],
      "markers": "python_version >= '3'",
      "version": "==2.0.10"
    },
    "idna": {
      "hashes": [
        "sha256:84d9dd047ffa80596e0f246e2eab0b391788b0503584e8945f2368256d2735ff",
        "sha256:9d643ff0a55b762d5cdb124b8eaa99c66322e2157b69160bc32796e824360e6d"
      ],
      "markers": "python_version >= '3'",
      "version": "==3.3"
    },
    "requests": {
      "hashes": [
        "sha256:68d7c56fd5a8999887728ef304a6d12edc7be74f1cfa47714fc8b414525c9a61",
        "sha256:f22fa1e554c9ddfd16e6e41ac79759e17be9e492b3587efa038054674760e72d"
      ],
      "index": "pypi",
      "version": "==2.27.1"
    },
    "urllib3": {
      "hashes": [
        "sha256:000ca7f471a233c2251c6c7023ee85305721bfdf18621ebff4fd17a8653427ed",
        "sha256:0e7c33d9a63e7ddfcb86780aac87befc2fbddf46c58dbb487e0855f7ceec283c"
      ],
      "markers": "python_version >= '2.7' and python_version not in '3.0, 3.1, 3.2, 3.3, 3.4' and python_version < '4'",
      "version": "==1.26.8"
    }
  },
  "develop": {}
}
Pipfile.lock is also a JSON file. It contains the following sections:
- First part defines some meta information & specifies the spec being used for the Pipfile. It also specifies the Python version.
- Next section states where the libraries/packages were sources from.
- The default section contains each of the packages - that is both parent and child packages - that were installed in the virtual environment. Each library has a name, a hash describing its content and is fully pinned to the version that is installed in this case.
- Final section is about the dev dependencies. If you install something with the
--devflag, once installed, the package would be shown here.
Pipfile.lock is locking dev-packages and packages. Locking means that versions for installed packages are being pinned to one specific version. The install command also adds the parent package to the Pipfile.
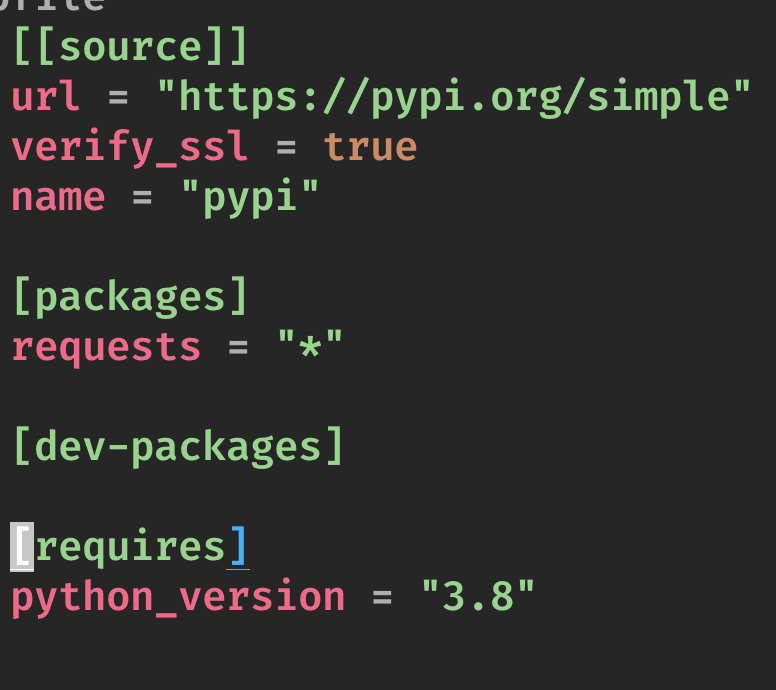
As you can see, the only change is that the package requests has been added to the packages section. There is an ‘*’ in front of the package name, which means that any version is allowed. From PyPi this would fetch the most recent version. Had we specified the version during installation, that version number would be here. pipenv does not notify the user about child dependencies. I find this feature useful since it keeps the dependency tree lean. Only the main packages are all we should care about.
Let’s say later down the line you would want to update the packages used or, more likely, pin the packages to a specific version. You can do it in the same way you would have done it with pip. Just uninstall the existing package and re-install using pipenv. The version in the Pipfile would be updated automatically & by default it would also generate a new lock file to pin the new version being used in the project. Simply editing the Pipfile and then running pipenv install would not work. This is because the lock file has already pinned the version being used, therefore the version in the lock file is final. If you want to update the current version to a new one, uninstall first & re-install. This check is amazing in my opinion, if the lock file exists your package version would always be pinned. However, if the lock file does not exist, package numbers from the Pipfile will be used. So another way to tackle the lock is to delete the lock file (not recommended) and start over with
pipenv install
To install dev packages- in general or in the above case - simply add the --dev keyword to the install command. Dev packages are the ones that are not required in a production environment. Once installed, either as dev or normal package, that package is avaiable for us in your virtual environment. Hence you do no need to double install or maintain two separate lists. NOTE: the above command installs packages from Pipfile. If however you would want to install packages that mimic the production environment, use the lock file. Command for this is given in the next section.
Lock files are strict and do no handle conflicts well. If you have packages that have conflicting child dependencies, pipenv would notify you during the installation (Personal experience). This is a great thing because, in the case of pip, if an older version of a dependency was installed, pip would update or downgrade it according to the most recent install command. pipenv does not do that. Since versions need to be locked in the Pipfile.lock, pipenv makes sure that no conflicts like these exist. However, you can use an override called --skip-lock. This is not a recommended approach & should only be done if you know what you’re doing. --skip-lock would not generate a new lock file, therefore versions would not be pinned. Any update to the Pipfile would result in an update to the existing package - requirements.txt behaviour again.

Useful commands in pipenv
pipenv includes numerous commands that can be used to enhance your workflow. Given below is a list of such commands:
pipenv install --ignore-pipfile
When you would want your development environment to mimic your production environment, instead of using the Pipfile, use the Pipfile.lock. And corollary to this, use Pipfile.lock for all your production builds.
pipenv install --dev
This command installs both packages and dev packages. In the case of a normal pipenv install, dev packages are ignored. This is useful for new developers that are setting up the project for the first time.
pipenv graph
This command would show the tree-like structure of the project packages. This is what it would look like:
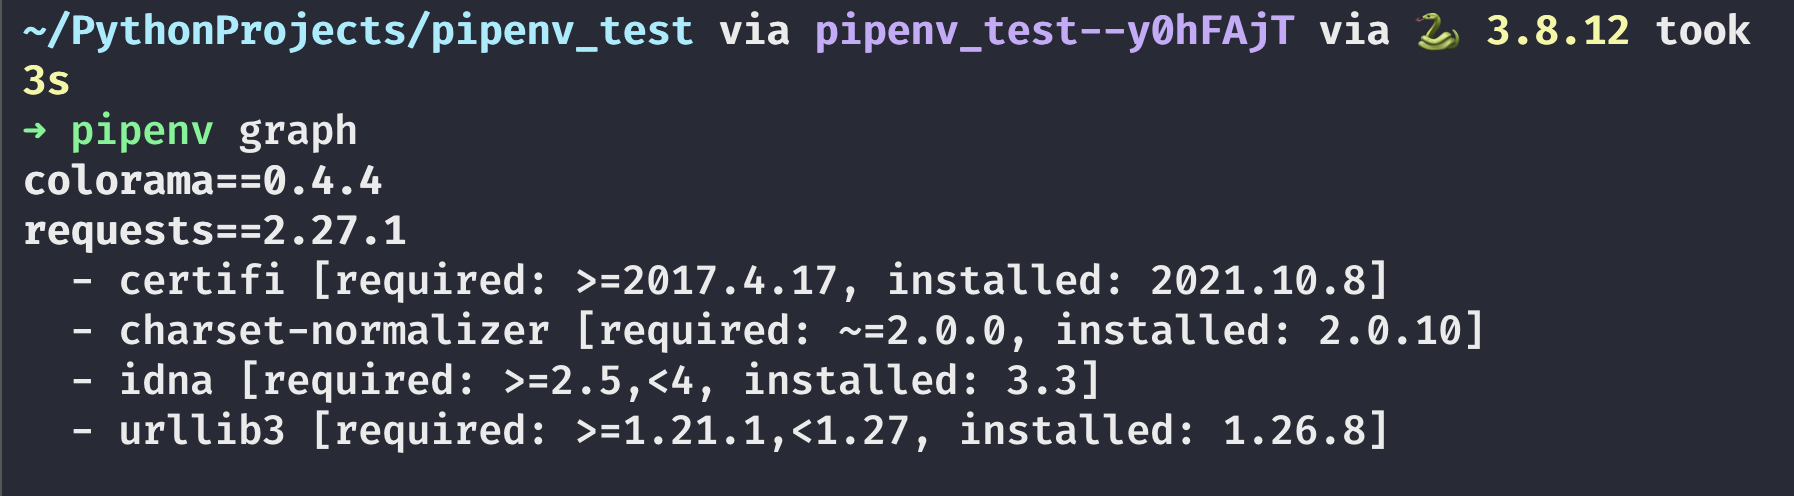
The parent packages are shown at the top, and their child dependencies are shown below it. This is useful in evaluating package dependencies & can help resolve conflicts, if they occur.
pipenv graph --reverse
The command will present the dependencies in a tree-like structure but reverse. Child dependencies are presented on top and parent dependencies are given below them.
pipenv run <insert command here>
For running a command in the virtual environment without launching a shell. This is similar to docker exec -it. I don't use it often but it might be useful in case each project has it's own python version and some packages are bound to a particular version only. No examples for this use case since I have not encountered this myself.
pipenv check
This checks for security vulnerabilities in the environment. npm audit is the functional equivalent for this.
pipenv --venv
Gives the path for the virtual environment of the project.
pipenv --where
The command finds out and presents the projects' home
pipenv uninstall --all
Uninstall all packages. --all-dev is used to delete just the dev packages
pipenv open flask
This command opens the given package for editing. I don't use this alot since the default package behaviour is good enough, but if you would want to tweak something in a pacakge, this is the command for it.
Conclusion
My verdict is based purely on personal experience. I believe that pipenv is an extremely helpful tool, capable of revolutionizing the python workflow. I would encourage you to use pipenv for your upcoming python projects. Honestly, for smaller projects with fewer collaborators, the default workflow is more than enough. For projects with multiple collaborators & which are large scale, pipenv is definitely a boon. I personally use the Pipfile while developing the project. Once I'm done with it, I generate a lock file and deploy it using the lock file. This has helped me achieve clarity with my packages. Again, this is personal opinion & therefore can be wrong. For more seasoned developers - who are switching to python from languages like JS or who would want to have a more deterministic workflow - I would highly recommend pipenv. For the curious ones among us, this is the pipenv official documentation:
Do check it out! I hope you found this valuable! Thanks again and I'll see you in the next one!