Sketching app in Flutter - Refactor
Refactor time!
If you think this is a series, you are not wrong. Our sketching app has not reached its full potential yet. And to reach full potential, you have to make crucial changes. We have our canvas ready (literally), now let's use it to make something even better!
I had always thought about revamping the app, probably since day 1. The reason is simple: our application is bare bones. It is a good starter app, no doubt. The app helps you get your basics right, especially for beginners. But what next? In a real-world application, you need more than basics. Currently, the app supports just one functionality. We can drag our brush on-screen & paint. We understood how to implement a CustomPainter class, work with on-screen drag to render paint & combine these two elements to get the final application.
For a full-fledged sketching app, some features that are good to have would include:
- Changing brush color (blue gets boring soon 💤)
- Changing brush width (minute details)
- Changing canvas color from yellow to something else
- Save the sketch we have, locally on our device
These are some points off the top of my head. Although it would be fun to compete with MS Paint, for now, let's try to refactor our bare-bones Sketching app to accommodate these new requirements. After this refactoring, we will implement the above changes in the next tutorial! Consider this as Sketching App Flutter - 1.5
If you haven't already checked it out, please check out Part-1 of this series. At the end of the blog, you will find the Github Repository. Please fork it and use that as a starter for this one. Lets' get started!
And so it begins...
My OCD finally kicked in. I had to refactor the application to make it close to what a final application would look like. Here is a list of all updates that I have done to the existing code. Reiterating this, this is just a refactor & you would be just fine with the next tutorial - albeit with some difficulty- if you skip this. Refactoring changes :
- The folder structure should look like this. You can follow the file names I have here or decide your nomenclature.
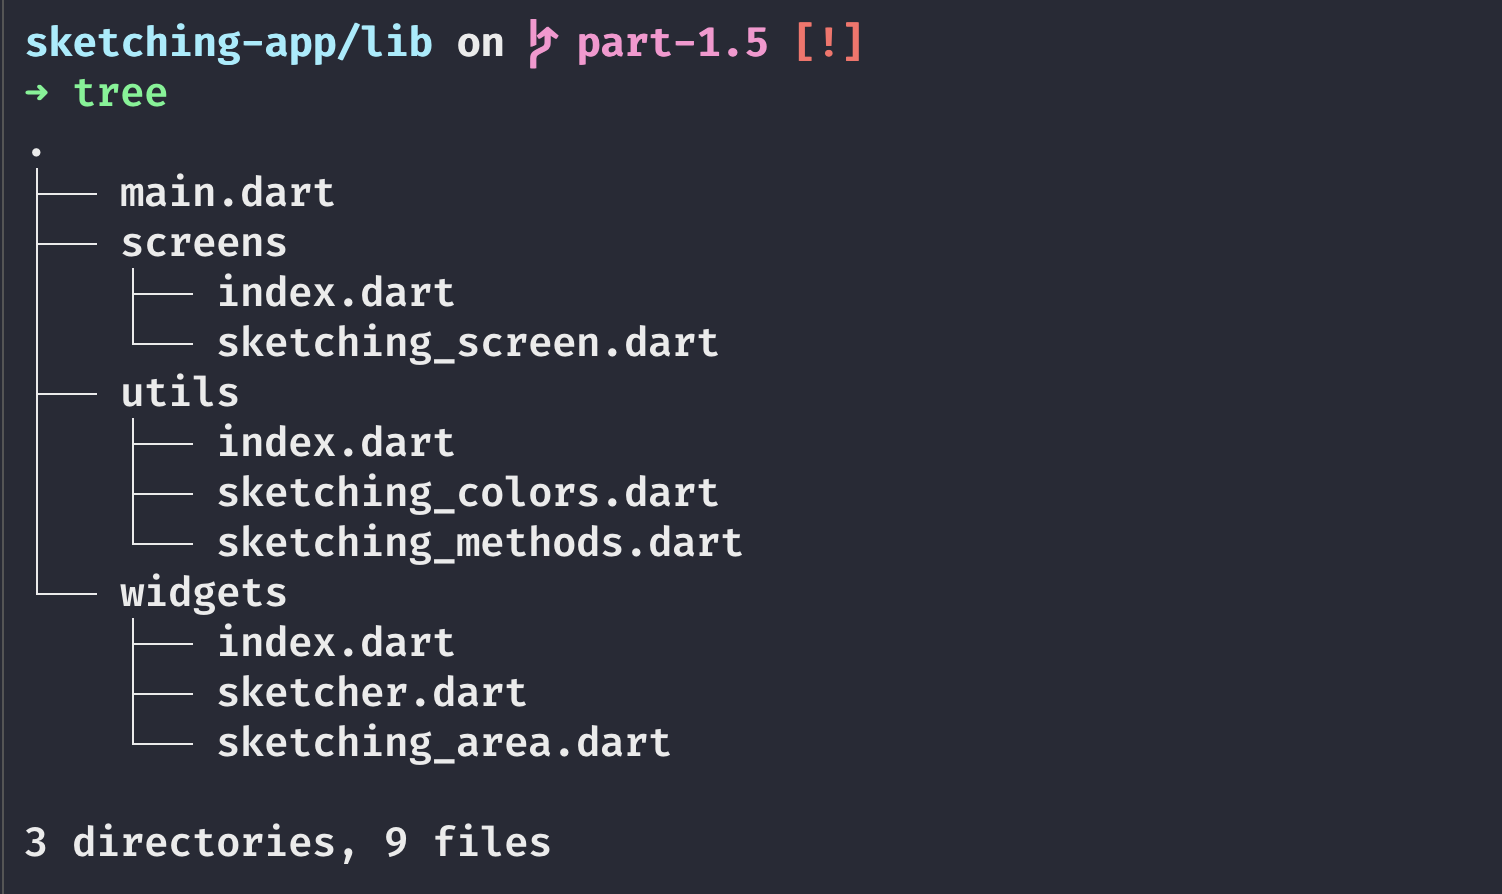
- All index files should only have exports, so I will not include their content. An example of one file is below. You can ignore this step - I like to minimize the imports in any file.
export './sketching_methods.dart';
export './sketching_colors.dart';
File-wise changes are below. Let's have a look at each of the files now.
main.dart
import 'package:flutter/material.dart';
import 'package:sketching/screens/index.dart';

// Sketching app for Flutter!
void main() => runApp(const MyApp());

class MyApp extends StatelessWidget {
  const MyApp({Key? key}) : super(key: key);

  @override
  Widget build(BuildContext context) {
    return MaterialApp(
      title: 'Sketching App',
      theme: ThemeData(primarySwatch: Colors.deepPurple),
      debugShowCheckedModeBanner: false,
      home: const SketchingScreen(),
    );
  }
}
We have removed all extra widgets from the file. This file is now solely responsible for initialization of app. Everything here seems to be pretty self-explanatory.
widgets/sketching_area.dart
import 'package:flutter/material.dart';
import 'package:sketching/utils/index.dart';
import 'package:sketching/widgets/sketcher.dart';

class SketchingArea extends StatelessWidget {
  final List<Offset?> points;
  final PanUpdate onPanUpdate;
  final PanEnd onPanEnd;
  final PanStart onPanStart;
  final Color? backgroundColor;

  const SketchingArea(
      {Key? key,
      this.backgroundColor = SketchingColors.backgroundDefault,
      required this.onPanEnd,
      required this.onPanStart,
      required this.onPanUpdate,
      required this.points})
      : super(key: key);

  @override
  Widget build(BuildContext context) {
    return GestureDetector(
      onPanUpdate: (DragUpdateDetails details) => onPanUpdate(details),
      onPanEnd: (DragEndDetails details) => onPanEnd(details),
      onPanStart: (DragStartDetails details) => onPanStart(details),
      child: RepaintBoundary(
        child: Container(
            width: MediaQuery.of(context).size.width,
            height: MediaQuery.of(context).size.height,
            color: backgroundColor,
            child: CustomPaint(
              painter: Sketcher(points),
            )),
      ),
    );
  }
}

typedef PanUpdate = void Function(DragUpdateDetails details);
typedef PanEnd = void Function(DragEndDetails details);
typedef PanStart = void Function(DragStartDetails details);
This is a new file that I have created for the entire sketching area. It is considered good practice to have separation of concerns in your projects. As seen, we have reduced the responsibility of this Widget by introducing abstractions for all the methods & the points array. Our widget is now lean in terms of logic & only integrates the canvas (our container) and Sketcher class.
widgets/sketcher.dart
import 'package:flutter/material.dart';

class Sketcher extends CustomPainter {
  //list of points which are to be painted
  final List<Offset?> points;

  Sketcher(this.points);

  @override
  void paint(Canvas canvas, Size size) {
    //properties of the paint used to draw
    Paint paint = Paint()
      ..color = Colors.blue
      ..strokeCap = StrokeCap.round
      ..strokeWidth = 5.0;

    // iterate through all the points
    // check if the initial and final points
    // are not null. If not null then draw using
    // canvas function.
    for (int i = 0; i < points.length - 1; ++i) {
      if (points[i] == null) continue;
      if (points[i + 1] != null) {
        canvas.drawLine(points[i]!, points[i + 1]!, paint);
      }
    }
  }

  @override
  bool shouldRepaint(Sketcher oldDelegate) {
    return oldDelegate.points != points;
  }
}
This is the same class that we had implemented in the last tutorial. No changes to this yet - since this is an independent widget (CustomPainter widget) I have included it in the widgets folder.
utils/sketching_colors.dart
import 'package:flutter/material.dart';

class SketchingColors {
  static const backgroundDefault = Color(0xffffeca6);
  static const backgroundBlue = Color(0xffa4c2f4);
  static const backgroundGreen = Color(0xffb1fcc5);
  static const backgroundGrey = Color(0xffdcdedc);
  static const backgroundPink = Color(0xfffacaf5);
  static const backgroundOrange = Color(0xffffe9b5);

  // Palette colors
  static const red = Color(0xfff70f1a);
  static const blue = Color(0xff0c0ced);
  static const green = Color(0xff17f00c);
  static const orange = Color(0xffff9a17);
  static const black = Color(0xff000000);
  static const white = Color(0xffFFFFFF);
}
This file contains all the colors used in our app. We would import the class wherever needed & use the colors defined. It is just for the pre-defined configuration given to our users. For a more fine-tuned color picking, I would also use the package flutter_colorpicker (more on this in the next one).
utils/sketching_methods.dart
import 'package:flutter/material.dart';

abstract class SketchingMethods {
  void onPanUpdate(DragUpdateDetails details);
  void onPanEnd(DragEndDetails details);
  void onPanStart(DragStartDetails details);
}
Finally, something exciting! In our first iteration, we defined the logic for panning within our GestureDetector itself. The problem with that approach is obvious. For each update, we would have to change the detector itself. This approach is cumbersome & against the Single Responsibility Principle. We have already abstracted our widget. Now we need to abstract out our methods.
Think about how we are sketching currently. We are implementing onDrag methods on our GestureDetector. In Android, anything that is related to actions is an interface. You must have heard of the analogy: classes are for entities (to represent something), interfaces are for action. Since these methods are also actions that the user would do on screen, they should be part of an interface that is implemented by the class that is using this. Dart does not contain the keyword interface, therefore to implement one we do:
You can check out the official documentation to get clarity on this.
Our methods are un-implemented since the class is abstract. We would implement this class on our sketching screen Widget in the next step.
screens/sketching_screen.dart
import 'package:flutter/material.dart';
import 'package:sketching/utils/index.dart';
import 'package:sketching/widgets/index.dart';

class SketchingScreen extends StatefulWidget {
  const SketchingScreen({Key? key}) : super(key: key);

  @override
  _SketchingScreenState createState() => _SketchingScreenState();
}

class _SketchingScreenState extends State<SketchingScreen>
    implements SketchingMethods {
  late List<Offset?> points;

  @override
  void onPanUpdate(DragUpdateDetails details) {
    RenderBox box = context.findRenderObject() as RenderBox;
    Offset point = box.globalToLocal(details.globalPosition);
    setState(() {
      points = List.from(points)..add(point);
    });
  }

  @override
  void onPanEnd(DragEndDetails details) {
    points.add(null);
  }

  @override
  void onPanStart(DragStartDetails details) {
    RenderBox box = context.findRenderObject() as RenderBox;
    Offset point = box.globalToLocal(details.globalPosition);
    setState(() {
      points = [point];
    });
  }

  @override
  void initState() {
    super.initState();
    points = [];
  }

  @override
  void dispose() {
    super.dispose();
    points.clear();
  }

  @override
  Widget build(BuildContext context) {
    return Scaffold(
      /// For future blogs, the Stack widget is suitable xD
      body: Stack(
        alignment: Alignment.center,
        children: [
          SketchingArea(
            onPanEnd: onPanEnd,
            onPanStart: onPanStart,
            onPanUpdate: onPanUpdate,
            points: points,
          ),
        ],
      ),
      floatingActionButton: FloatingActionButton(
        backgroundColor: SketchingColors.red,
        child: const Icon(Icons.refresh),
        tooltip: 'Clear Screen',
        onPressed: () {
          setState(() {
            points = [];
          });
        },
      ),
    );
  }
}
Now to our one and only screen in this entire app 😁 We have moved this widget from main.dart and renamed it. Major changes to this include:
- Stack now contains our
SketchingAreawidget instead of the function we had in the previous iteration. Sketching area includes methods and points array which I will explain next - Our
Statefulwidget now implements ourSketchingMethodsinterface (abstract class technically). As a result, we have to overrid the methods that are included in the class and implement them here. If you check these methods, these are the same methods we had implemented in theGestureDetector. The onPanStart method was commented in the initial iteration, we have enabled it in this one.
Instead of copy pasting this file I would suggest going step by step. Abstract the widget out of main.dart. Then, implement the SketchingMethods interface. Use VSCode's prompt to automatically implement the methods for the given interface. Once overrides are generated, copy the implementations of these methods from existing code. Complete this & finally implement the SkechingArea widget in this file. This procedure would surely help you understand the entire process of refactoring. I personally feel this skill goes a long way and can be used on other frameworks/languages as well.
Run the app again to see if it builds properly, without errors and with just one change in behaviour due to the addition of onPanStart method. Rest assured, it is important to have that method in place for the next part.
I hope this exercise helped you get a new perspective about how to code in Flutter. In the next tutorial, we will implement the functionality we had discussed. Stay tuned!
PS: As a challenge, try to draw/write refactor on the emulator screen in the current state of the app 😜